#13. Argh, Even with Lifelines Ripouts are No Fun

IMG_20180424_1413435_rewind

My last blog included that I do use lifelines, especially on big or complicated projects.  For me, “complicated” can mean it has a pattern.  Indeed not long after my last post I discovered that I had made an error in my pattern that I repeated row after row.  I had to rip out the sweater almost back to the lifeline in the picture.  Lifelines in that case didn’t work because I didn’t realize there was an error.  I had to rip out past lifelines.

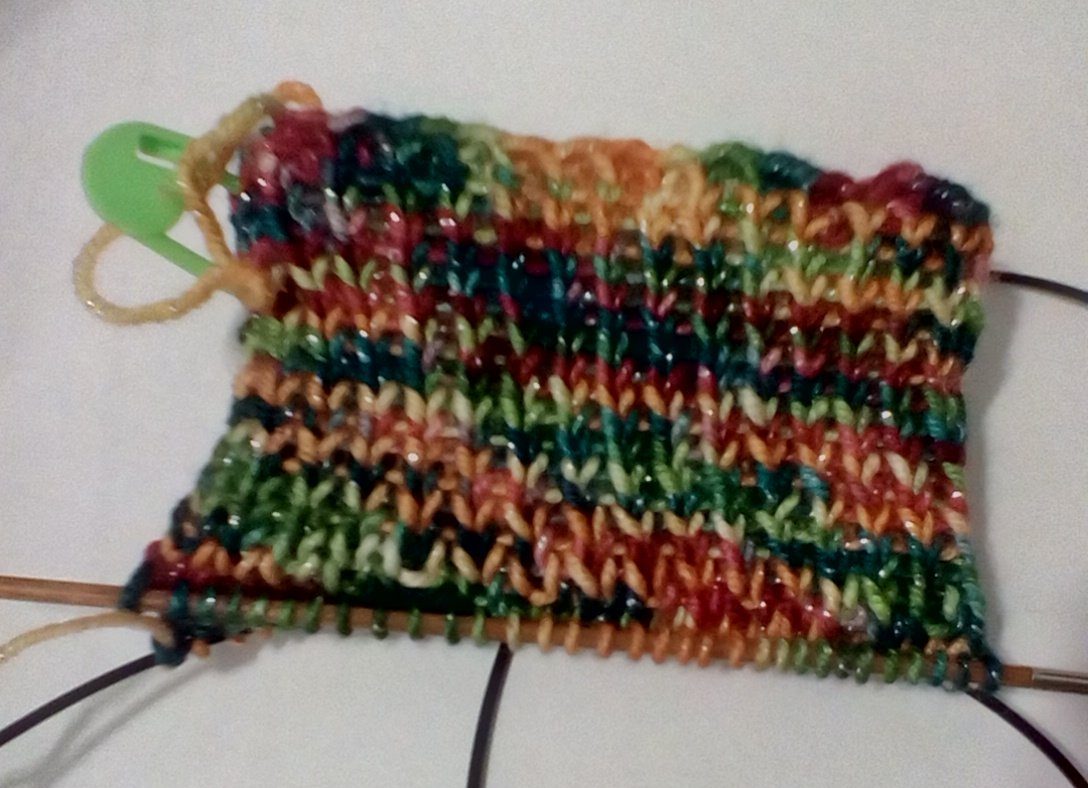
This picture shows how I’m putting in a lifeline every 24 rows, or two repeats of the pattern.  Ideally I’d put them in every 12 rows, one pattern, but I’m not willing to take the time to put in a lifeline that often.  Guess I’m feeling pretty confident I have the pattern figured out and I’m unlikely to drop a stitch.

A lifeline is simply another piece of yarn, preferably a thinner yarn than what you are knitting with, that you “sew/weave” through the stitches before starting the next row.  This way the stitches are on a string so that if you have to rip out, you can simply pull out the yarn until you reach the string.  Then you feed your knitting needle back through the stitches and start again.

Lifelines aren’t that essential is your are knitting simple purl or knit stitches.  But I find them essential if I’m knitting more complicated stitches like k2tog or ssk where multiple stitches are joined to make one.  Or where I’m increasing stitches   It’s easy for me to drop a stitch when trying to undo these stitches on a rip out.

In theory I could remove the earlier lifelines since I shouldn’t need to rip back to where I’m at.  I’m confident the knitting is “right” to the most recent lifeline.  But I’ve decided to wait until the sweater is done and remove them all at once.  I have plenty of ‘waste” yarn so I do not need to reuse my lifelines although I have done that in the past.  I just feel safer with all these lifelines.

#12. Stitch Markers and Lifelines

IMG_20180405_1741033_rewind

I do love stitch markers.  A fellow knitting classmate calls me the marker queen.  Sadly, despite all my markers, I still sometimes forget what the marker was supposed to remind me of.

I’m currently working on a sweater for my daughter.  It has a pattern down the front.  Therefore I need markers for the back side of each sleeve (it’s a raglin sleeve – so it’s knitted in rather than a separate piece) and the front side of each sleeve.  I use two markers chained together to differentiate the left side from the right side.  Then I need markers at the start and end of front pattern section. Plus I need a marker for where the row (also called a round) begins.  Those are what the pattern calls for.

I like to add markers to help me count stitches.  For example, the pattern has three sections.  I’ve added markers between the sections to help me make sure I haven’t mistakenly added or dropped a stitch and to help me keep track of where I’m at while knitting the pattern.  I also put markers every 10 stitches across the back and across the sleeves.  This helps me double check that I have added stitches evenly on the rows where stitches have to be added to make the shoulders wide enough.

I use different colors and shapes to help me keep track of what the markers means.  Most important is that the markers transfer easier from one needle to the other so as not to overly slow down my knitting, especially since I use so many!!  The result is kinda pretty with all those different colors.

As discussed previously, I like the big bright colored plastic “pins” but they don’t stay pinned so they can catch on the yarn or fall off.  So I used a few as a chain on the markers where I need to remember to increase stitches.  I used my round bright colored markers for the sleeve and pattern markers, purple for the back, yellow for the front, and blue for the pattern.  I used the little metal pins in white as stitch counters across the back.  I used the little white plastic round markers as stitch counters across the sleeves.  Finally I used green round markers to mark the sections of the pattern.

In the picture you can see a thread of gold a few rows up from the bottom.  This is a lifeline.  Since this my first time to make this sweater, it is very likely I’ll make mistakes.  A strand of yarn is woven through the stitches where I know everything to this point is okay.  Then I knit on.  If I make a mistake that needs a major rip out, I only need to rip out back to here.  In this case I’ve just finished the first set of the pattern.  I am working on the second set.  When it is finished successfully, I’ll put in a new lifeline and remove this one.

Lifelines is how I was finally able to complete the very patterned brown shawl I gave Sara.  I was ready to give up after having to start over multiple times.  Lifelines allowed me to keep what had been done correctly without restarting at the beginning.  Since this is my first time making this patterned sweater, I’m sure I’m going to need a lifeline or two.